I previously covered how to decode Nexa smart power plug remote control signals using Arduino Uno. The drawback of Arduino was the limited capture time and somewhat inaccurate timing information (when using a delay function instead of an actual hardware interrupt timer).
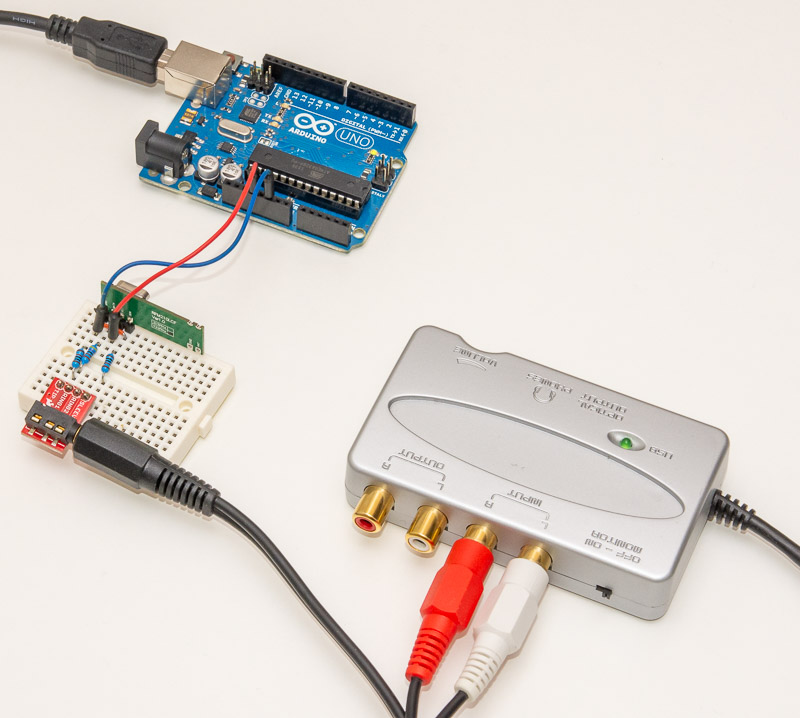
Another way to look at signals is an oscilloscope, and a soundcard can work as a "poor man's oscilloscope" in a pinch. You wire the signal to left/right channel (you could even wire two signals at the same time) and "measure" by recording the audio. It helps if ground level is shared between the soundcard and the signal source. In this case I achieved it pretty well by plugging the Arduino that still provides 3.3V voltage for the 433 MHz receiver chip to the same USB hub as the soundcard.
Another thing to consider is the signal level. Soundcard expects the voltage to be around 0.5V, whereas our receiver is happily pushing full 3.3V of VCC when the signal is high. This can be fixed with a voltage divider -- I wired the signal via a 4.7 kOhm resistor to the audio plug tip, and a 1 kOhm resistor continues to GND -- effectively dropping the voltage to less than a fifth of original.
The audio plug "sleeve" should be connected to GND as L/R channel voltages are relative to that. There was a 0.1V difference in voltage between soundcard sleeve and Arduino GND so I decided to put a 1 kOhm resistor also here to avoid too much current flowing through a "ground loop".
Note that I'm using a SparkFun breakout for the plug that makes connecting the plug to a breadboard quite easy. If you need to wire it directly to the connector (signal to "tip" and ground to "sleeve"), refer to diagram here: https://en.wikipedia.org/wiki/Phone_connector_(audio). A word of caution: You can break stuff if you wire it incorrectly or provide too high voltage to some parts, so be careful and proceed at your own risk!
You can see the circuit in the picture above. Note that due to receiver needing GND in two places, I've been able to connect the sleeve to another GND point (rightmost resistor) than the other 1 kOhm resistor that is part of the voltage divider (leftmost resistor)
Trying it out with Audacity
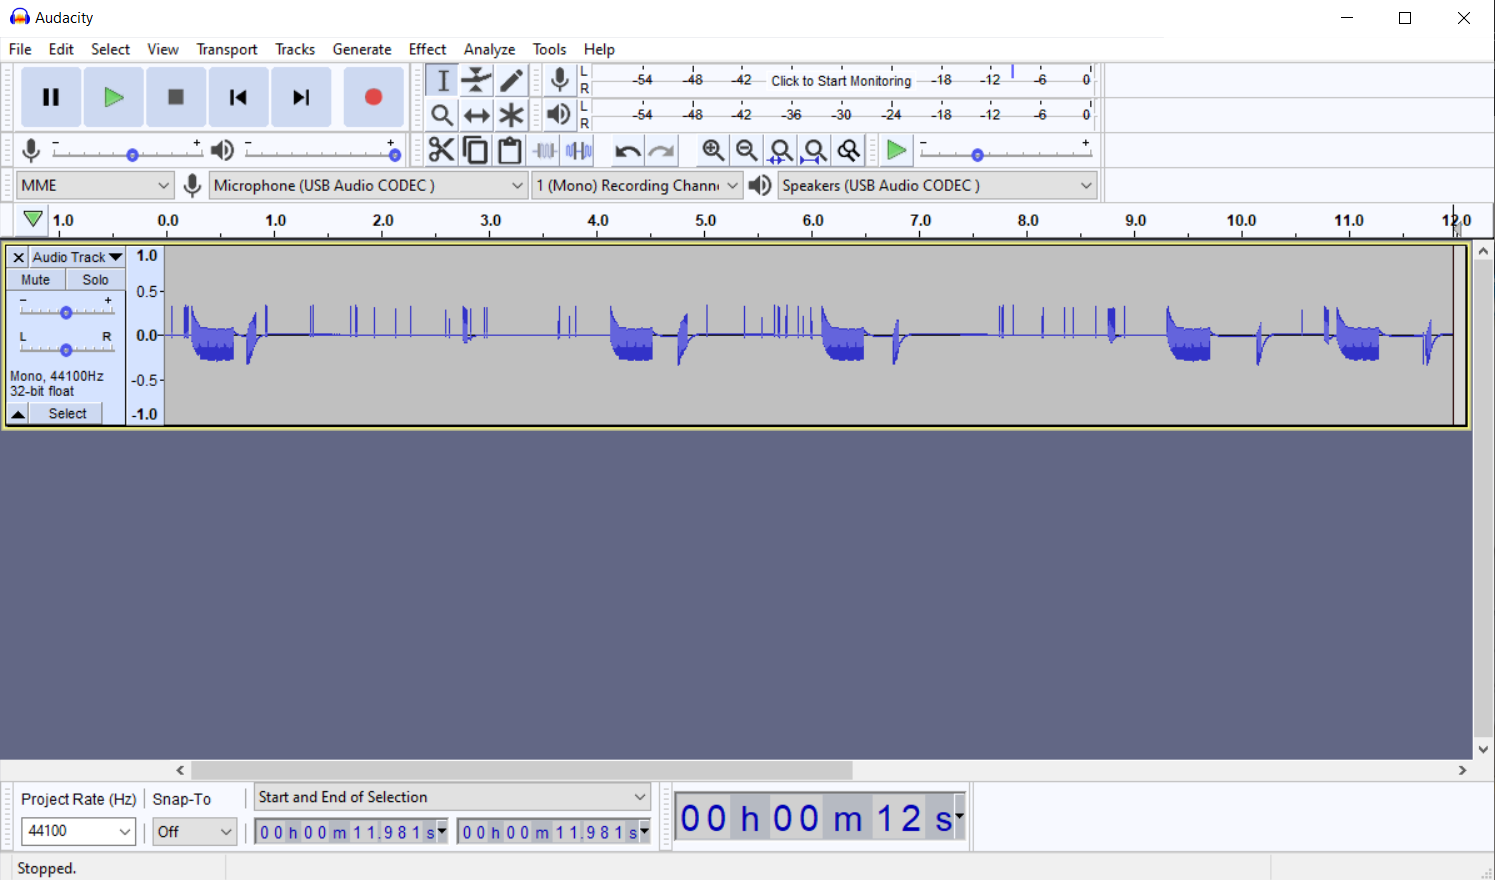
Once you have power to the receiver, and 1 kOhm resistors to sleeve and tip and signal through a 4.7 kOhm (anything between that and 22 kOhm works pretty well with 16 bits for our ON/OFF purposes), you can start a recording software like Audacity to capture some signals. Here is a sample recording where I've pressed the remote a couple of times:
As you can see, our signal is one-sided (audio signals should be oscillating around GND, where as our is between GND and +0.5V) which causes the signal to waver around a bit. If you want a nicer signal you can build a somewhat more elaborate circuit but this should do for our purposes.
Huggingface'stransformers library is a great resource for natural language processing tasks, and it includes an implementation of OpenAI's CLIP model including a pretrained model clip-vit-large-patch14. The CLIP model is a powerful image and text embedding model that can be used for a wide range of tasks, such as image captioning and similarity search.
The CLIPModel documentation provides examples of how to use the model to calculate the similarity of images and captions, but it is less clear on how to obtain the raw embeddings of the input data. While the documentation provides some guidance on how to use the model's embedding layer, it is not always clear how to extract the embeddings for further analysis or use in other tasks.
Furthermore, the documentation does not cover how to calculate similarity between text and image embeddings yourself. This can be useful for tasks such as image-text matching or precalculating image embeddings for later (or repeated) use.
In this post, we will show how to obtain the raw embeddings from the CLIPModel and how to calculate similarity between them using PyTorch. With this information, you will be able to use the CLIPModel in a more flexible way and adapt it to your specific needs.
Benchmark example: Logit similarity score between text and image embeddings
Here's the example from CLIPModel documentation we'd ideally like to split into text and image embeddings and then calculate the similarity score between them ourselves:
from PIL import Imageimport requestsfrom transformers import AutoProcessor, CLIPModelmodel = CLIPModel.from_pretrained("openai/clip-vit-large-patch14")processor = AutoProcessor.from_pretrained("openai/clip-vit-base-patch32")url = "http://images.cocodataset.org/val2017/000000039769.jpg"image = Image.open(requests.get(url, stream=True).raw)inputs = processor( text=["a photo of a cat", "a photo of a dog"], images=image, return_tensors="pt", padding=True)outputs = model(**inputs)logits_per_image = outputs.logits_per_image # this is the image-text similarity scoreprobs = logits_per_image.softmax(dim=1) # we can take the softmax to get the label probabilities
If you run the code and print(logits_per_image) you should get:
from PIL import Imageimport requestsfrom transformers import AutoProcessor, AutoTokenizer, CLIPModelmodel = CLIPModel.from_pretrained("openai/clip-vit-large-patch14")# Get the text featurestokenizer = AutoTokenizer.from_pretrained("openai/clip-vit-large-patch14")inputs = tokenizer(["a photo of a cat", "a photo of a dog"], padding=True, return_tensors="pt")text_features = model.get_text_features(**inputs)print(text_features.shape) # output shape of text features# Get the image featuresprocessor = AutoProcessor.from_pretrained("openai/clip-vit-large-patch14")url = "http://images.cocodataset.org/val2017/000000039769.jpg"image = Image.open(requests.get(url, stream=True).raw)inputs = processor(images=image, return_tensors="pt")image_features = model.get_image_features(**inputs)print(image_features.shape) # output shape of image features
Looks pretty good! Two 768 item tensors for the two labels, and one similarly sized for the image! Now let's see if we can calculate the similarity between the two...
A friend recently started a project to remotely boot his router (which tends to hang randomly) with Raspberry Pi. Unfortunately, the rpi-rf tool was not quite recognizing the signals. I pitched in to help, and as he did not have access to an oscilloscope, but had an Arduino Uno, I thought maybe I could figure it out with that.
Fast forward a few weeks later, I have been experimenting with four methods analyzing my own Nexa 433 MHz remote controller:
Having learned a lot, I thought to document the process for others to learn from, or maybe even hijack to analyze their smart remotes. In this first part, I will cover the process with Arduino Uno, and the following posts will go through the other three methods.
Starting Simple: Arduino and 433 MHz receiver
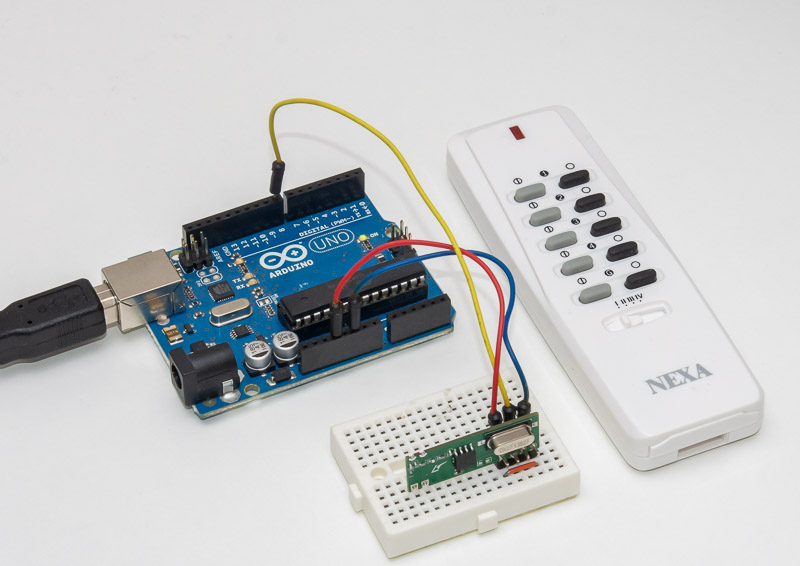
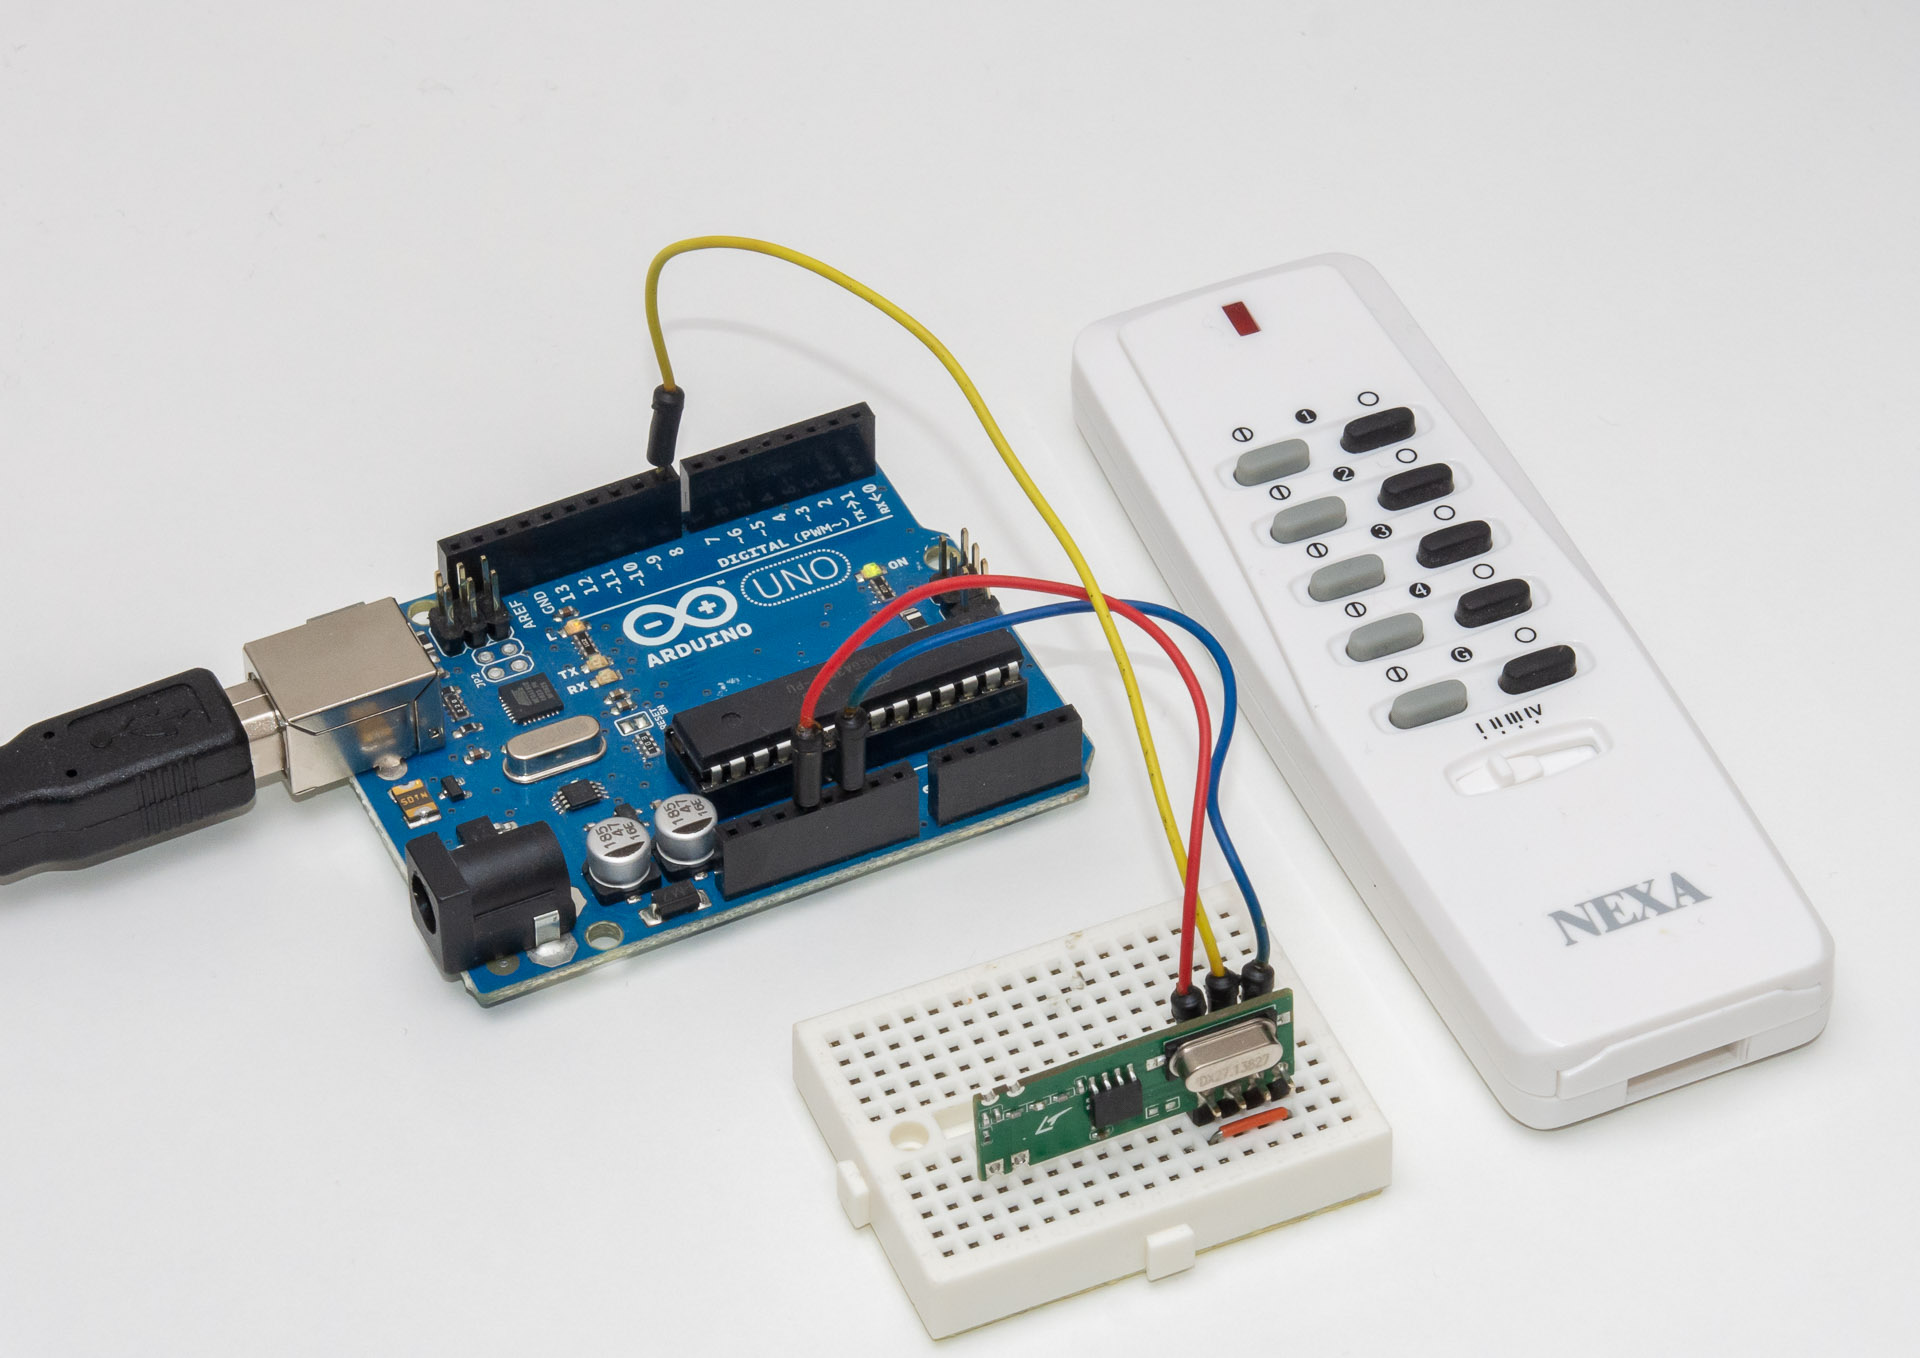
Having purchased a rather basic Hope Microelectronics (RFM210LCF-433D) 3.3V receiver for the 433 MHz spectrum signals, it was easy to wire to Arduino:
Connect GND and 3.3V outputs from Arduino to GND and VCC
Connect Arduino PIN 8 to DATA on the receiver
Connect a fourth "enable" pin to GND as well to turn the receiver on
I wrote a simple Arduino script that measures the PIN 8 voltage every 50 microseconds (20 kHz), recording the length of HIGH/LOW pulses in a unsigned short array. Due to memory limitation of 2 kB, there is only space for about 850 edges, and the maximum length of a single edge is about 65 000 samples, i.e. bit more than three seconds.
Once the buffer is filled with edge data or maximum "silence" is reached, the code prints out the data over serial, resets the buffer and starts again, blinking a LED for 5 seconds so you know when you should start pressing those remote control buttons. Or perhaps "press a button", as at least my Nexa pretty much fills the buffer with a single key press, as it sends the same data of about 130 edges a minimum of 5 times, taking almost 700 edges!
It also turned out that the "silence" limit is rarely reached, as the Hope receiver is pretty good at catching stray signals from other places when there is nothing transmitting nearby (it likely has automatic sensitivity to "turn up the volume" if it doesn't hear anything).
In recent years, the use of graphics processing units (GPUs) has led to the adoption of methods like PBKDF2 (Password-Based Key Derivation Function 2) for secure password storage. PBKDF2 is a key derivation function that is designed to be computationally expensive in order to slow down dictionary attacks and other brute force attacks on passwords. With the increase in processing power that GPUs provide, PBKDF2 has become a popular choice for password storage.
As the development of processing power continues to advance, it has become necessary to increase the number of iterations used in PBKDF2 in order to maintain a high level of security. With more iterations, it becomes even more difficult for an attacker to crack a password using brute force methods.
Recently, I had an idea. What if it were possible to run PBKDF2 arbitrarily long and print out points that match certain criteria? This could potentially provide an even higher level of security for password storage, as the number of iterations could be increased to levels that would make brute force attacks infeasible. It's an idea worth exploring and I'm excited to see what the future holds for PBKDF2 and other password security measures.
Bitcoin difficulty
One of the key features of the Bitcoin network is its use of difficulty to scale the hardness of block signing based on the number of computers that are currently mining. In other words, as more computers join the network and begin trying to solve the cryptographic puzzles required to add new blocks to the blockchain, the difficulty of these puzzles increases in order to maintain a consistent rate of block creation. This ensures that the network remains secure and resistant to attacks, even as the number of miners grows over time.
The basic idea behind this technique is fairly simple: by requiring that a certain number of zeros be added to the block hash, the complexity of the puzzle increases in powers of two. Every hash is essentially
random, and modifying the hashed data by the tiniest bit results in a new hash. Every other hash ends in zero, and every other in one. With two zero bits, it's every 4th. To zero a full byte (8 bits) you already need 256 (2^8) tries. With three bytes, it's already close to 17 million.
Printing out PBKDF2 steps at deterministic points
Combining the two ideas is one way to deterministically create encryption keys of increasing difficulty:
Having just spent 4 hours trying to get a Python pseudocode version of PBKDF2 to match with hashlib.pbkdf2_hmac() output, I thought I'll post Yet Another Example how to do it. I thought I could just use hashlib.sha256 to calculate the steps, but turns out HMAC is not just a concatenation of password, salt and counter.
So, without further ado, here's a 256 bit key generation with password and salt:
import hashlib, hmacdef pbkdf2(pwd, salt, iter): h = hmac.new(pwd, digestmod=hashlib.sha256) # create HMAC using SHA256 m = h.copy() # calculate PRF(Password, Salt+INT_32_BE(1)) m.update(salt) m.update(b'\x00\x00\x00\x01') U = m.digest() T = bytes(U) # copy for _ in range(1, iter): m = h.copy() # new instance of hmac(key) m.update(U) # PRF(Password, U-1) U = m.digest() T = bytes(a^b for a,b in zip(U,T)) return Tpwd = b'password'salt = b'salt'# both should print 120fb6cffcf8b32c43e7225256c4f837a86548c92ccc35480805987cb70be17bprint(pbkdf2(pwd, salt, 1).hex())print(hashlib.pbkdf2_hmac('sha256', pwd, salt, 1).hex())# both should print c5e478d59288c841aa530db6845c4c8d962893a001ce4e11a4963873aa98134aprint(pbkdf2(pwd, salt, 4096).hex())print(hashlib.pbkdf2_hmac('sha256', pwd, salt, 4096).hex())
Getting from pseudocode to actual working example was surprisingly hard, especially since most implementations on the web are on lower level languages, and Python results are mostly just using a library.
Simplifying the pseudo code further
If you want to avoid the new...update...digest and skip the hmac library altogether,
the code becomes even simpler. HMAC is quite simple
to implement with Python. Here's gethmac function hard-coded to SHA256 and an even shorter pbkdf2:
WebSocket is a protocol that allows for real-time, bidirectional communication between a client and a server. It is often used in web applications to enable features such as chat, live updates, and multiplayer games.
In this tutorial, I will show you how to create a minimalistic WebSocket server using Go and the nhooyr websocket library, and a JavaScript client to test it out. You will learn how to handle WebSocket connections, send and receive messages, and close the connection when necessary.
By the end of this tutorial, you will have a working WebSocket server and client that you can use as a starting point for your own WebSocket-based applications.
Setting up the project
You should first set up a simple "Hello world" go project, something along the lines of this tutorial. After you have a project going, let's install nhooyr.io/websocket WebSocket library (Go's own seems deprecated and Gorilla development has ceased some years ago):
$ go get nhooyr.io/websocket
The whole system will consist of main.go that will contain a simple net/http server that will:
Serve a simple WebSocket echo server at /echo
Serve static files from static subfolder – essentially other addresses including / will try content from there. We'll
put index.html under that subfolder.
Basic webserver stuff:
func main() { address := "localhost:1234" http.HandleFunc("/echo", echoHandler) log.Printf("Starting server, go to http://%s/ to try it out!", address) http.Handle("/", http.FileServer(http.Dir("static"))) err := http.ListenAndServe(address, nil) log.Fatal(err)}
Now the echoHandler will do a few essential items:
Upgrade the connection into a WebSocket one with websocket.Accept
Log errors and defer connection close in case of errors
Loop forever (or actually 10 minutes in this sample), reading messages from
the socket and writing them back.
Note that I've used InsecureSkipVerify to accept connections from any
origin, you might want to modify the code for a tighter policy: